Kate C++ Helper Plugin
Mini HowTo
This page describe actions to configure the plugin for your project.
Requirements
- C++14 compatible compiler (gcc >= 4.9)
- clang >= 3.3
- cmake >= 2.8.12
- Kate editor version >= 3.8
- KDE >= 4.8
- boost library >= 1.49 required since version 0.8.7
- xapian library >= 1.2.12 required since version 1.0
Note
Mentioned package versions are known to work, but maybe lesser versions could work for you.
Try to fix them in CMakeLists.txt (around corresponding find_package()) and please report back to me.
Installation
Unpack (or clone) sources to some workng directory, then execute the following commands from it:
$ cd <plugin-sources-dir>
$ mkdir build && cd build
$ cmake -DNO_DOXY_DOCS=ON -DBUILD_TESTING=OFF -DCMAKE_INSTALL_PREFIX=$(kde4-config --localprefix) ..
$ make
$ make install
Configuration
To enable the plugin for your current session use Settings -> Configure Kate… -> Plugins:

Now use plugins’ configuration page to ajdust some settings. First of all make sure the System Paths List
have a proper directories list used by your compiler (gcc by default). Initially, the plugin try to detect
known compilers (gcc and clang) from your path. If current list is not suitable for you, clear it and
choose appropriate compiler from a list below the page and press Add to List.
Support for compilers not in the PATH in my TODO list (for example manually built fresh or crosscompiler gcc).
The Other (disabled now) option has reserved for this purpose.

Add anything else that as you think belongs to all kate sessions.
The next page is a Session Paths List. Here is a #include directories list for your current session
(usually I have at least one session per project). You can store this list into a configuration file for
future quick load using Favorite and Stored Sets. By default the plugin provides one predefined set
Qt4 with directories reported by Qt detection script at plugin compilation time.
Typical dirs you have to add here is the following:
- root of your project’s source/build tree and/or any other directories inside your project
- paths to libraries, used in the project, as reported by corresponding configuration tools
The plugin also try to suggest some directories based on opened documents’ paths.
Personally I use only two #include directories in all my projects: a source tree root and a build root.
And every source file contains a full path relative to one of listed paths when #include something.
Particularly this technique helps to simplify configuration management when you have to add a bunch of
-I options in your build system configuration files and track inter-component dependencies
all the time you’ve added a new #include directive in you sources… so finally you’ve got
a particular compiler command line options the half of your terminal window height :)

The next page allows you to add more compiler options, such as:
- defines found by your build system or required by third party libraries used, so code completer will see (and suggest) appropriate declarations
- do not forget to add
-xc++if you have a C++ project. Also consider to add-std=c++11and any other options which could affect internal compiler’s predefined macros

The plugin is capable to use a Precompiled Headers file. If you have it for your project
is it recommended to specify it in Session PCH header to compile option. Typically this header
consist of #include directives for most used header files in your sources. For cmake based projects
I have a module which helps
to make it by command make update-pch-header. To use it add UsePCHFile.cmake,
PreparePCHHeader.cmake.in and pch_template.h.in files to your cmake modules directory of your project
and in a top level CMakeLists.txt call it like this:
include(UsePCHFile)
use_pch_file(
    PCH_FILE ${CMAKE_BINARY_DIR}/my-project-pch.hh
    EXCLUDE_DIRS cmake docs
  )
Then you may add this file to CLang Settings page and plugin will build it and use while code completion.
The mentioned CMake module actually is a part of a
collection of reusable modules
under control of chewy utility
To install it using chewy:
$ chewy install https://raw.github.com/mutanabbi/chewy-cmake-rep/master/UsePCHFile.cmake
* Receiving the module file https://raw.github.com/mutanabbi/chewy-cmake-rep/master/UsePCHFile.cmake
* Receiving the addon file https://raw.github.com/mutanabbi/chewy-cmake-rep/master/PreparePCHHeader.cmake.in
* Receiving the addon file https://raw.github.com/mutanabbi/chewy-cmake-rep/master/pch_template.h.in
any required additional files will be installed automatically.
The next configuration page of the plugin allows you to fine tune completion results.
Automatic code completion option nowadays is a quite stupid: it tries a completion after user enters . or -> in a source code. But more important that it can annoy on a heavy project (with boost library for example).

The most important thing on this page is a set of regular expressions that can be used to filter
completion results. For example, Boost Preprocessor library define a lot of internal symbols which are
not a part of public API (same for some other libraries from Boost). Also unlikely you want to see
various #incldue guards… Using completion results sanitizer you may enter a regex like below
to filter them out:
BOOST_(PP_[A-Z_]+_(\d+|[A-Z])|.*_HPP(_INCLUDED)?$|[A-Z_]+_(AUX|DETAIL)_)
Leaving a replacement part empty instruct the code completer to remove matched completions. Another practical
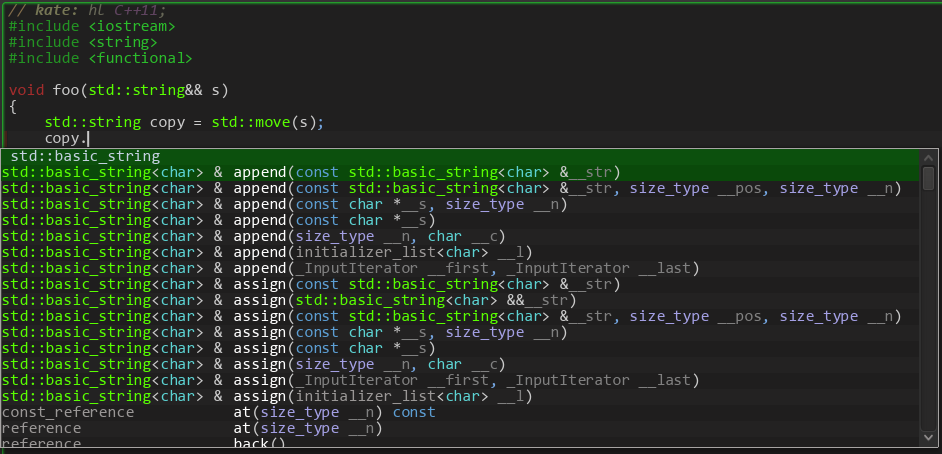
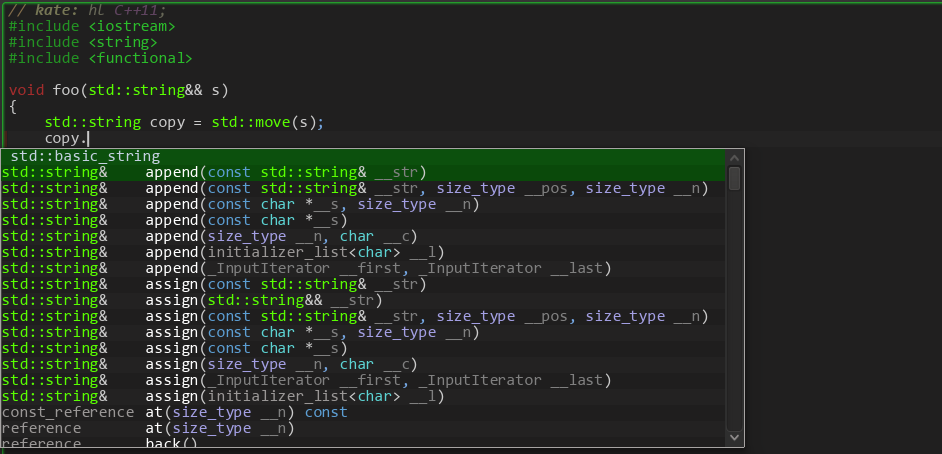
example of usage of sanitizer is to beautify some verbose names and to make them litle shorter. For example
the completer may contain items with std::basic_string<char>, which is well known as std::string, so to make
a particular completion result slightly shorter I use the regex like on a screen shot…
The package provide a sample set of rules which could be found at
/usr/share/apps/kate/plugins/katecpphelperplugin/sample.sanitizer-rules. Use import to get them.
The Other Settings page contains options related to #include directives and a code completer.
The plugin has action (default key is Shift+F10) to copy #include statement with current file
into a clipboard, so you may switch a document and just paste it. The first option in a
#include Helper Options group specify the format of that preprocessor directive.
At the end of this group you may find a list of file extensions (not a wildcards!) to exclude from
#include completion list.

Based on your system and session directories lists the plugin may highlight #include directives
in a source file with an error or warning background. The first one can occur then a file specified is
not found. That means you have to add some more paths to the system/session list. In case of multiple
files found (same name, but different paths) background turned to a warning. In that case it depends
on -I compiler options order which one will be actually processed.
The plugin may monitor configured #incldue directories, so then a missed file will appear
(after required package being installed or files generated in a build directory), it will remove an
error mark. One may specify that to monitor in the middle options group.
Attention
Monitoring too much (nested) directories, for example at /usr/include configured as
a system directory, may lead to high resources consumption, so inotify_add_watch would
return a ENOSPC error. Use strace to find out and/or check kate’s console log for
strange messages from DirWatch.
So if your system short of resources (memory) just try to avoid live #include files
status updates. Otherwise one may increase a number of available files/dirs watches by doing this:
# echo 16384 >/proc/sys/fs/inotify/max_user_watches
To make it permanent add the following to /etc/sysctl.conf or
/etc/sysctl.d/inotify.conf (depending on system):
fs.inotify.max_user_watches = 16384
To open a header file just move cursor on a line containing #include and press F10 key.
If no valid directive recognized on a current line, a dialog with a list of currently included files will appear.
If you have no write permission to opened file (most likely files from /usr/include) read-only
mode will be applied automatically.

Open Header/Implementation Motivation
kate shipped with a plugin named Open Header, but sooner after I started to use it I’ve found
few cases when it can’t helps me. Nowadays I have 2 “real life” really annoying examples when it fails:
-
Often one may find a source tree with separate
${project}/src/and${project}/includedirs. So, when you are at some header frominclude/dir, that plugin obviously will never find your source file. And vise versa. -
The second case: sometimes I have a really big class defined in a header file (let it be
my_huge_application.hh). It may consist of few dickers of methods each of which is hundred lines or so. In that case I prefer to split implementation into several files and name them after a base header likemy_huge_application_cmd_line.cc(for everything related to command line parsing),my_huge_application_networking.cc(for everything related to network I/O), and so on. As you may guess Open Header plugin will fail to find a corresponding header for that source files.
Last settings group on Other Settings page allow you to tune Open Header/Implementation behaviour.
It is a good practice to have the very first #include directive in a .cc/.cpp file to be a corresponding
header. So, checking the first option in that group will add it to a list of candidates when you press F11 key.
The second option (Use wildcard source files search) aimed to solve the second “real life” problem:
being in a header file and pressing F11 it appends all .cc/.cpp files started w/ a current header name
to a list of candidates.
Since version 1.0.3, the plugin has a simple Preprocessor Directive Completer. It has automatic substitution
feature – i.e. when user contine to type and there is no ambiguity preprocessor directive would be inserted.
E.g. to insert #pragma one need to type just 2 characters # and p – it could be “strange” for awhile,
but really convinient later. ;-)
 |
 |
Also there is Header Files Completer aimed to help to complete #include directive taking files
from a real filesystem searching configured directories and/or relative to a current document.
That is all! (briefly ;-)
Indexing Source Code
Since version 1.0 Kate C++ Helper plugin has indexing feature. One may configure indexed collections via Indexer Settings in the tool view.

After adding a new index and some targets to be indexed, it is ready to rebuild.
Note that…
when build, current compiler options, configured for a session will be used. Diagnostic tab will contain
indexing progress details. In case of too many errors, consider to fix compiler options (like add some missed
-I options for third party libraries).
After index has built you can use it from any other session despite of any options.
After rebuilding completed and collection available for search, one may use search tab to find something. There are few special terms (filters) can be passed to the search engine. Generic format of them is:
keyword:value
value can be a boolean, string or numeric type. In fact only one (true) value needed for boolean type, so as a value only “y” is accepted. For example to find virtual functions just add “virtual:y” filter, otherwise (if no filter specified) all kinds of symbols will be found.
access:public|protected|privatefilter by visibility inside the class scopeanon:yoranonymous:yshould a symbol be in some anonymous scope (namespace, struct, union)-
base:<class-name>to find a symbols (classes or structures) inherited from the specified class/struct.base:QAbastractItemModel base:basic_ios -
inheritance:public|protected|privateevery kind of inheritance could be prefixed withvirtual-. The short form of this filter isinh. Example, to find classes virtually inherited from thebasic_ios:inh:virtual-public base:basic_ios decl:<name>orref:<name>filters to lookup only declarations or references (usage) of the specified namedef:ysometimes declaration and definition could be in different places (lexical containers). This boolean filter allows to find that cases.kind:<value>filter symbols of specified kind, where value can be of one of the following:ns,ns-alias,typedef,type-alias,struct,class,union,enum,enum-const,fn,method,ctor,dtor,conversion,param,var,field,bitfieldpod:yshow only PODs-
scope:<name>restrict search only withing given scope. name paramater could be a name (possible fully qualified) of a namespace, class, struct, union, or enum. For example to get all public typedefs ofstd::basic_string:access:public scope:std::basic_string kind:typedef static:yshow only static data or function members.template:y|ps|fsshow only template symbols, which can be a partial specialization (psvalue), full specialization (fsvalue) or just a template (yvalue).virtual:yshow only virtual function members (i.e. declared w/ avirtualkeyword)arity:M..Nrestrict search for functions (including member functions, constructors or conversion functions) with arity in a given range[M,N]align:M..N,size:M..Nrestrict search for types withalignof()orsizeof()limited by the range[M,N]line:M..N,column:M..Nrestrict search for symbols in a specified range of lines/columns
Search terms can be combined into a logical expressions with the following keywords: AND, OR, NOT, XOR
and/or parentheses.
Everything else considered as search terms (symbol names). Wildcards are supported.
Enjoy searching! :-)
